How to insert equation numbering in MS Word

It is of essential to insert equation number if you are working on your thesis and/or any scientific paper that consists of a lot of equations. The easiest and probably the best way of doing this is to write your manuscript in latex. Do consider that but if that is not an option then you can follow the following steps:

  1. I have a manuscript where I want to insert a number of equations in order.
    Screen Shot 2019-05-09 at 12.24.39 PM.png
    Let’s first start with one equation.
  2. We select the equation, and then go to the references tab
    Screen Shot 2019-05-09 at 12.28.46 PM.png
  3. We click on the `Insert Caption` option and select the `label` as an equation. We can exclude the label from the caption if desired.
    Screen Shot 2019-05-09 at 12.30.01 PM.png
  4. We can also edit the numbering format.
    Screen Shot 2019-05-09 at 12.32.14 PM.png
    We can select to include the chapter number where the chapter starts with heading 1 numbering and use the separator as “period”. Here, I chose to exclude the chapter number in the numbering.
    Screen Shot 2019-05-09 at 12.34.45 PM.png
  5. Now, we insert the table with 3 columns and format the cell size according to our requirement.
    Screen Shot 2019-05-09 at 12.37.00 PM.png
    Screen Shot 2019-05-09 at 12.37.20 PM.png
  6. Now, we cut and paste the equation and equation number in the second and third column respectively.
    Screen Shot 2019-05-09 at 12.39.19 PM.png
  7. Now, we need to align everything. We do this by selecting the table and going to the layout tab and `align center`.
    Screen Shot 2019-05-09 at 12.40.35 PM.png
  8. For the table, we don’t need a border, so remove it.
    Screen Shot 2019-05-09 at 12.42.00 PM.png
  9. Now, we have an equation and its number. We can now write as many equations as we like by just copy and paste the format. We can right click and update the field to get the ordered numbering of equations.
    Screen Shot 2019-05-09 at 1.03.43 PM.png
    We can also edit the equation label and use `Eq.` instead of just a number.
    Screen Shot 2019-05-09 at 1.05.17 PM.png

Hope, this article might come handy in your writing of your thesis!

Using GitHub for Team Collaboration: Part II

Introduction to GitHub

We first need an account on the GitHub. You can sign up on the GitHub website .

Screen Shot 2018-10-17 at 2.47.08 AM.png


Steps for starting a repository on Github:

Screen Shot 2018-10-17 at 2.50.20 AM.png

Screen Shot 2018-10-17 at 2.51.39 AM.png

Screen Shot 2018-10-17 at 2.54.47 AM.png

Now, we push the code from our master branch to the GitHub.

git status
git push https://github.com/utpalkumariesas/learn_git.git master

Screen Shot 2018-10-17 at 2.58.44 AM.png

Now, let’s add some more changes to the master branch and push those changes to the GitHub. Before that, we can create an alias to the long address to the online repository of the GitHub so that we don’t need to type that again and again. Here, we use “origin” as an alias.
git remote add origin https://github.com/utpalkumariesas/learn_git.git
Now, we can simply type
git push origin masterto push the repository to the remote location on GitHub.

Screen Shot 2018-10-17 at 3.07.58 AM.png

Cloning remote repository locally

We can instead do the other way round too. We can clone the online repository onto our local computer.

Screen Shot 2018-10-17 at 3.14.40 AM.png

Screen Shot 2018-10-17 at 3.20.27 AM.png

Collaborating on GitHub

The first thing we should make sure that we have the updated master code present locally. We can pull the code using the pull command in the cloned directory
git pull origin master
Now, we made a new branch called complex_app and made some changes and commit those changes.

Screen Shot 2018-10-17 at 3.29.51 AM.png
Now, we want to push this branch to the remote repository on the GitHub. We do not want to merge this with the master and then push to the remote GitHub repository as this will mess up the master branch on the GitHub. Later, all the collaborators can review the code and then decide if they wanna merge it or not.

Screen Shot 2018-10-17 at 3.32.56 AM.png

Screen Shot 2018-10-17 at 3.33.38 AM.png

Screen Shot 2018-10-17 at 3.35.22 AM.png

Screen Shot 2018-10-17 at 3.38.25 AM.png

Forking

We can fork the repo on GitHub in order to contribute to some open source project. The forking will copy the open source project from other’s account to our own account. After that, we can clone that repository to our local computer. Later if we wanna contribute to that project, we can do the pull request. And then if the original creator of the project accepts the pull request then they can merge it to the original project.

Using GitHub for Team Collaboration: Part I

Why do we use Git?

Git can record changes to our file over time. We can recall any specific version of the file at any given time. It also allows many people to easily collaborate on a project and have their own version of the project files on their local computer. It is incredibly useful to keep all the histories of the project codes so that if we want to go back the previous version in the future, we don’t need to rewrite it but we can just switch back to the past version directly.

GitHub

Okay! So far we understood git to some extent. But what is “GitHub”? Well, GitHub is an online service that hosts our projects, helpful in sharing our code to other collaborators of the project. The collaborators can simply download the codes and work on them. They can re-upload their edits and merge with the main codebase.

Installing Git

The easiest way is just to download from the link here. Select the download for your operating system and this will download in your computer. Go through the installation steps and that’s it, you have Git now! If you are Windows user, then I’d suggest you install some text editor for writing and running codes. My personal favorite is “VSCode” by Microsoft. It is free, open-source and cross-platform i.e. it provides a similar environment for Windows, Linux, and Mac Users and it has inbuilt “terminal”.

After installing Git and supposedly VSCode then you open and terminal and type

git --version

Screen Shot 2018-10-16 at 11.43.24 PM.png

Setting up Git

Now, after installing Git in your local computer, the first thing that you wanna do is to set it up so that Git could know you. We can tell Git about us by telling the username and email.

git config --global user.name utpalkumar
git config --global user.email utpalkumar50@gmail.com


How Git works?

We make a container for our project where we dump all our codes and it is popularly called repositories (or repo, for short). We can have a repository on our local computer as well as remotely on some kind of online repository hosting service like GitHub. We can track the contents of the repository using Git. Git tracks the history of the contents of the repository using the so-called “commits”. Commits are the different points in the history of making the repository where we have told the Git to save. We tell the Git to save the version using the “commit” command which we will see in detail later. If we have made, say 5 commits to our repository, we can roll back to any previous commit smoothly.

Creating a repository

We first open an editor and a terminal for typing the commands. In VSCode, we can do it both in one window.

Screen Shot 2018-10-17 at 12.06.23 AM.png

Make sure the terminal and the editor points to the same path.

  1. To initialize empty Git repository in the directory, we type in the terminal:

git init

Screen Shot 2018-10-17 at 12.09.33 AM.png

The existence of the .git directory in our working directory shows that this is now the git repository. We can even initialize Git in a directory which already has contents in the same way.

After initializing the Git in the working directory, we can create and modify any files in the current directory or the sub-directory. After finishing the code modification, we can check the status of the Git using the command

git status

It will show the status of files which are tracked and untracked. We can add all the files in the current directory and subsequent subdirectory for the tracking using the command:

git add .

Alternatively, we can also add each file separately by their names.

Screen Shot 2018-10-17 at 12.47.46 AM.png

Sometimes, we don’t wanna add some files for committing to track using the Git but by mistake, it gets added. To remove those files, we can use the command:

git rm --cached filename

If we modify the file “testApp.py” and then run the command

git status

Screen Shot 2018-10-17 at 12.57.01 AM.png

Making Commits

In simple words, a commit is a safe-point, a snapshot in time of our code at a particular point.

git commit -m "some message"

Screen Shot 2018-10-17 at 1.03.50 AM.png

Please make sure to add meaningful messages to the commits so that at some point if we wanna go back to the previous version, we can figure that out easily using the message.

Screen Shot 2018-10-17 at 1.06.58 AM.png

If we wanna see the history of all our commits we can use the command

git log

Screen Shot 2018-10-17 at 1.11.13 AM.png

Sometimes, if we have a lot of commits, we don’t wanna print everything out. So, we can condense the output of the log using the command:

git log --oneline

Screen Shot 2018-10-17 at 1.14.23 AM.png

Undoing stuff

Undoing the mistake of one version is the primary goal of using Git. Let’s see how we can execute that. We can rewind the commit and go back to the previous version. We can do that by three ways in the order of increasing risk:

  1. Checkout commit: Very safe option. Best option to go back to the past version without getting rid of any other versions.
  2. Revert commit: Apparently, delete some unrequired commits from the history.
  3. Reset commit: We need to be very sure before we do this. This will permanently delete all the commits after the point we move to.

Screen Shot 2018-10-17 at 1.25.33 AM.pngHere, I have added 2 more commits and output the total of 4 commits.

Now, if we wanna see the state of the code at the point we added the axis labels only, we can do that.

git checkout 016b638

Screen Shot 2018-10-17 at 1.28.40 AM.png

This takes us back immediately to the previous version where we didn’t have the title or have changed the line styles. This is the best way to go back in time, inspect the past without changing anything. Now, we can come back to the present time by just using the command:

git checkout master

Screen Shot 2018-10-17 at 1.32.17 AM.png


Now, let’s say we wanna remove the commit where we have added the title to the plot. We can do that using the command:

git revert 60c62cb

When we execute this command, we get the following on the screen. Don’t get intimidated. This is a vim text editor which is asking you to give the title to this commit.

Screen Shot 2018-10-17 at 1.36.03 AM.png

We type “:wq” to save that file and quit.

Screen Shot 2018-10-17 at 1.40.42 AM.png

Now, we can see that this has removed the line in the code which added the title to the plot. But when we log the commits, we see that it has not actually deleted the commit but added a new commit which has reverted that commit.

Okay, if we want to permanently delete some commits and go back to the point in history, we can use the “reset” option

git reset 016b638

Screen Shot 2018-10-17 at 1.46.34 AM.png

Now, we see that all the commits from the point we moved in the past has been deleted but the code stays unchanged. This is a good way to merge some commits into one. But if we are really strict and want to change the code as well, we can do that using the flag “hard”:

Screen Shot 2018-10-17 at 1.49.15 AM.png

Beware that now there is no way to get back to the versions where we had title and linestyles.

Branches

So far we have been working on one branch that is the “master” branch of the repository. When we make any commits, we were committing only to the master branch. We usually use the master branch to represent the stable version of our codes. For that reason, we don’t really wanna try new features or new codes on this branch as there is a risk of messing up the code. What we can do is try out the new feature in an isolated environment and if we like it then we can merge then in the master branch. This is mainly useful if more than one person is working on a project. They can make the branch of the code, apply several new features and when they are really satisfied then they can add it to the master branch.

Screen Shot 2018-10-17 at 2.02.45 AM.png

If we wanna add the branch at this point of the code, we can do

git branch feature1

If we wanna see all the branches, we type

git branch -a

Screen Shot 2018-10-17 at 2.05.12 AM.png

The asterisk (*) in front of “master” shows that we are currently on the master branch. To switch the branch, we use

git checkout feature1

Screen Shot 2018-10-17 at 2.07.41 AM.png

Now, we can work on the branch “feature1” separately than the master branch

Screen Shot 2018-10-17 at 2.10.06 AM.png

When we switch back to the master branch, we can notice that we have not actually added any title

Screen Shot 2018-10-17 at 2.11.16 AM.png

If the things don’t work out as expected, we can even delete the branch

git checkout master# first we move to the master branch

git branch -d feature1 # this will give the error because this branch has not been merged with the master branch

Instead, we can use

git branch -D feature1

to forcibly delete the branch.

Okay, now let’s see more about working with the branches. The quick way of making a branch and checkout to it is

git checkout -b feature-a

Now, we work on this branch.

Screen Shot 2018-10-17 at 2.21.02 AM.png

Now, we have two branches “feature1” and “feature-a” going on at the same time. But neither one is affecting the original codes. One branch has some changes to the plotting of the data and the other branch is having the title to the plot. Now, how do we merge those two changes to the master branch?

Merging Branches

To merge the branches, we first need to move to the branch into which we wanna merge, which in our case is master branch.

git checkout master

git merge feature1

Screen Shot 2018-10-17 at 2.29.55 AM.png

Now, let’s merge the other branch

Screen Shot 2018-10-17 at 2.32.21 AM.png

This time, we encounter some conflicts to the merge. In this case, we need to manually fix the conflict and then add the files using

git add .
git commit

Then a vim editor will appear, just save and quit the editor using the command “:wq”.

Screen Shot 2018-10-17 at 2.41.40 AM.png

Deploying a Python app on Heroku Server

Heroku is a cloud platform supporting several programming languages. It allows a developer to build, run, and scale different applications. Heroku hosts its services on the Amazon’s EC2 cloud computing platform. The Heroku applications have a unique domain name “appname.herokuapp.com” which routes the run requests to the correct application containers or “dynos”.

For deploying an app on the Heroku server, we first need to install Heroku on the local computer. On Mac, just install using the Heroku and Git installer and it should do the job.

Now, I’d like to make the app using the Dash library of Plotly. This library makes the job of complex web coding quite smooth.

  1. Make a directory and “cd” to that directory
  2. Initialize the folder with git and a virtualenv. It is always a good idea to use separate environment for different projects.
git init #initializes an empty git repo
virtualenv venv
source venv/bin/activate

Screen Shot 2018-10-16 at 1.17.00 PM
virtualenv creates a fresh Python instance. We need to reinstall the app’s dependencies i.e. all the libraries required by the app we are making.
Let’s install all the dependencies:

pip install dash
pip install dash-renderer
pip install dash-core-components
pip install dash-html-components
pip install plotly
pip install gunicorn

Now, we initialize a folder with the app (app.py), a .gitignore file (to tell git what files in the directory to ignore), requirements.txt (tells heroku to install given packages), and a Procfile (for the command) for deployment.
For making the requirements.txt, we run

pip freeze > requirements.txt

After making all the above files, we can create the app on Heroku. The application is sent to heroku using either of Git, Github, Dropbox or via an API. Here, we will use Git.

heroku create utpal-dash-app
git add . #add all files to git
git commit -m 'Initial app to Heroku'
git push heroku master # deploy code to heroku
heroku ps:scale web=1  # run the app with a 1 heroku "dyno"
  1. Update the code and redeploy

When we modify app.py with our own code, you will need to add the changes to git and push those changes to heroku.

git status # view the changes
git add .  # add all the changes
git commit -m 'a description of the changes'
git push heroku master


Utility program: add all images in your directory to make a video


If you want to add all the images in your directory sequentially to make a video for a presentation then you can use this utility program.

In the first step, we will make a series of “.png” images by plotting the bar diagram of the GDP of the top 10 countries with years (1960-2017). We then add all these images sequentially to make a video. Here, we will add the images using the cv2 package of Python. Please keep in mind that the video can also be created using the matplotlib package of python. This is an alternative to perform the same task. In some cases, when we have a collection of images and we want to add them, then also this can be very handy.

To install the cv2 package using Anaconda, type:

conda install -c menpo opencv

Now, we can obtain the data for GDP of all countries from 1960-2017 from the World Bank website. We then use “pandas” package of Python to read the csv data file and “matplotlib” package to plot the bar diagram.

import numpy as np
import pandas as pd
import matplotlib.pyplot as plt
from matplotlib.ticker import FuncFormatter

# function for setting the format of values in billions of dollars
def trillions(x,pos):
    'The two args are the value and tick position'
    return '${:.1f}T'.format(x * 1e-12)
formatter = FuncFormatter(trillions)

df=pd.read_csv('API_NY.GDP.MKTP.CD_DS2_en_csv_v2_10203569.csv',skiprows=3)
df = df.set_index("Country Name")
with open('neglect_regions.txt',mode='r') as file:
    alist = [line.rstrip() for line in file]
# print(alist)
df=df.drop(alist)

years=np.arange(1960,2018)
xx=45
for year in years:
    num=10
    print(year)
    top_10=df.nlargest(num, str(year))
    # print(top_10[str(year)])
    fig, ax = plt.subplots(figsize=(10,6))
    ax.yaxis.set_major_formatter(formatter)
    plt.bar(np.arange(num),top_10[str(year)].values)
    plt.xticks(np.arange(num), top_10.index.values,fontsize=6)
    plt.title(str(year))
    plt.savefig('figures/gdprank_{}.png'.format(year),dpi=200,bbox_inches='tight')
    plt.close(fig) #to clear the memory
    plt.cla()

#source:https://data.worldbank.org


gdprank_2017.png

The series of bar diagram for each year from 1960-2017 is saved in the “figures” directory. Then we can run the command:

python conv_image2video.py -loc "figures" -o "world_countries_gdp.mp4"

to add all the “.png” images in the figures directory to make the video named “world_countries_gdp.mp4”.

Usage of the program “conv_image2video.py”

  1. To convert the images in the current directory, with the extension “.png”, output file name “output.mp4” and frame rate 5 fps, simply type:

python conv_image2video.py

  1. If you want to change some options, add the following flags:
-loc "path_to_images": This will look for images in the directory "path_to_images"; default="."
-o "custom_name.mp4": This will output the video with the name "custom_name.mp4"; default: "output.mp4"
-ext "jpg": This will work on the jpeg images; default: "png"
-fr "1": This will change the speed/frame rate of the video; default: "5"


To download this program, click here.

If you want to download all the files (program +examples), click here.

How to make the rotating globe


Many people have asked me how to make the rotating globe we have on our home page. This post will take you step by step how to make the rotating globe gif using “gnuplot”.

Installing GNUPLOT

To install gnuplot, you can follow this page.

In Mac, you can install gnuplot using the homebrew:

ruby -e "$(curl -fsSL https://raw.githubusercontent.com/Homebrew/install/master/install)"

This will install homebrew in your Mac in case you don’t have.
Then use the command:

brew install gnuplot --with-x11

This should do the job and then you should be able to run the command
gnuplot

Screen Shot 2018-11-03 at 3.55.53 PM.png
If this throws error then you can overwrite the symbolic links by
brew link --overwrite gnuplot

Making the rotating globe gif

Now, you can download the codes for making the gif from the GitHub by clicking here (Data Source: gnuplotting). Run this bash script in your computer, it may take a few seconds and you should be able to get the “globe.gif” file.

Screen Shot 2018-11-03 at 4.05.23 PM.png

globe.gif

Working with MATLAB & Python simultaneously and smoothly​

MATLAB and Python are both well known for its usefulness in the scientific computing world. There are several advantages of using one over another. Python is preferable for most of the programmers because it’s free, beautiful, and powerful. MATLAB, on the other hand, has advantages like there is the availability of a solid amount of functions, and Simulink. Both the languages have a large scientific community and are easier to learn for the beginners. Though MATLAB, because it includes all the packages we need is easier to start with than the Python where we need to install extra packages and also require an IDE. The proprietary nature of the algorithms in MATLAB i.e., we cannot see the codes of most of the algorithms and we have to trust them to implement for our usage makes us sometimes hard to prefer MATLAB over the other options available like Python. Besides, these proprietary algorithms of MATLAB come at a cost!

In short, in order to excel in all of our scientific tasks, we need to learn to utilize both of them interchangeably. This is where Python’s module SciPy comes in handy. MATLAB reads its proprietary “mat” data format quite efficiently and fastly. The SciPy’s module, “loadmat” and “savemat” can easily read and write the data stored in the Python variable into the “mat” file, respectively. Here, we show an example to use the data from MATLAB in the “mat” format to plot in Python on a geographical map, which Python can execute much efficiently than MATLAB.

Saving the MATLAB variables into a “mat” file

In this example MATLAB script, we show how can we read the “mat” file in the MATLAB script and save it.

clear; close all; clc 

%% Load the two matfiles with some data into the workspace
load python_export_CME_ATML_orig_vars;
load station_info;

%% Remove the unrequired variables from the MATLAB's memory 
clearvars slat slon;

%% Saving the data from the "station_info.mat" file as a cell data type
stns={slons' slats' stn_name'}; 

%% Conduct some operations with the data and save it in "admF" variable
admF=[]; %intializing the matrix
std_slU=std(slU);
for i=1:length(slons)
    ccU=corrcoef(dU(:,i),slU); %Making use of the available MATLAB functions
    std_dU=std(dU(:,i));
    admF=[admF ccU(1,2)*(std_dU/std_slU)];
end

%% Saving the output "admF" matrix into the "MATLAB_export_admittance_output.mat" file at a desired location.
save('../EOF_python/MATLAB_export_admittance_output.mat','admF')

Using the data from the “mat” file in Python to plot on a geographical map

import scipy.io as sio #importing the scipy io module for reading the mat file
import numpy as np #importing numpy module for efficiently executing numerical operations
import matplotlib.pyplot as plt #importing the pyplot from the matplotlib library
from mpl_toolkits.basemap import Basemap #importing the basemap to plot the data onto geographical map
from matplotlib import rcParams
rcParams['figure.figsize'] = (10.0, 6.0) #predefine the size of the figure window
rcParams.update({'font.size': 14}) # setting the default fontsize for the figure
from matplotlib import style
style.use('ggplot') # I use the 'ggplot' style for plotting. This is optional and can be used only if desired.

# Change the color of the axis ticks
def setcolor(x, color):
     for m in x:
         for t in x[m][1]:
             t.set_color(color)

# Read the two mat files and saving the MATLAB variables as the Python variables
ADF = sio.loadmat('MATLAB_export_admittance_output.mat')
admF=np.array(ADF['admF'])[0]

STN = sio.loadmat('station_info.mat')
slon=np.array(STN['slons'])[0]
slat=np.array(STN['slats'])[0]

## Converting MATLAB cell type to numpy array data type
stnname=np.array(STN['stn_name'])[0]
sname=[]
for ss in stnname:
    sname.append(ss[0])
sname=np.array(sname)

## Plotting the admittance values
plt.figure()
offset=0.5
m = Basemap(llcrnrlon=min(slon)-offset,llcrnrlat=min(slat)-offset,urcrnrlon=max(slon)+offset,urcrnrlat=max(slat)+offset,
        projection='merc',
        resolution ='h',area_thresh=1000.)
xw,yw=m(slon,slat) #projecting the latitude and longitude data on the map projection

m.drawmapboundary(fill_color='#99ffff',zorder=0) #plot the map boundary
m.fillcontinents(color='w',zorder=1) #fill the continents region
m.drawcoastlines(linewidth=1,zorder=2) #draw the coastlines
# draw parallels
par=m.drawparallels(np.arange(21,26,1),labels=[1,0,0,0], linewidth=0.0)
setcolor(par,'k') #The color of the latitude tick marks has been set to black (default) but can be changed to any desired color
# draw meridians
m.drawmeridians(np.arange(120,123,1),labels=[0,0,0,1], linewidth=0.0)

cax=m.scatter(xw,yw,c=admF,zorder=3,s=300*admF,alpha=0.75,cmap='viridis') #plotting the data as a scatter points on the map
cbar = m.colorbar(cax) #plotting the colorbar
cbar.set_label(label='Estimated Admittance Factor',weight='bold',fontsize=16) #customizing the colorbar
plt.savefig('all_stations_admittance.png',dpi=200,bbox_inches='tight') #saving the best cropped output figure as a png file with resolution of 200 dpi.

Output figure from Python

all_stations_admittance

Writing NetCDF4 Data using Python

For how to read a netCDF data, please refer to the previous post. Also, check the package and tools required for writing the netCDF data, check the page for reading the netCDF data.

Importing relevant libraries

import netCDF4 
import numpy as np

Screen Shot 2017-10-03 at 2.20.50 PM.png

Let us create a new empty netCDF file named “new.nc” in the “../../data” directory and open it for writing.

ncfile = netCDF4.Dataset('../../data/new.nc',mode='w',format='NETCDF4_CLASSIC') 
print(ncfile)

Screen Shot 2017-10-03 at 2.30.59 PM.png

Notice here that we have set the mode to be “w”, which means write mode. We can also open the data in append mode (“a”). It is safe to check whether the netCDF file has closed, using the try and except statement.

Creating Dimensions

We can now fill the netCDF files opened with the dimensions, variables, and attributes. First of all, let’s create the dimension.

lat_dim = ncfile.createDimension('lat', 73) # latitude axis
lon_dim = ncfile.createDimension('lon', 144) # longitude axis
time_dim = ncfile.createDimension('time', None) # unlimited axis (can be appended to).
for dim in ncfile.dimensions.items():
 print(dim)

Screen Shot 2017-10-03 at 2.35.59 PM.png

Every dimension has a name and length. If we set the dimension length to be 0 or None, then it takes it as of unlimited size and can grow. Since we are following the netCDF classic format, only one dimension can be unlimited. To make more than one dimension to be unlimited follow the other format. Here, we will constrain to the classic format only as it is the simplest one.

Creating attributes

One of the nice features of netCDF data format is that we can also store the meta-data information along with the data. This information can be stored as attributes.

ncfile.title='My model data'
print(ncfile.title)

Screen Shot 2017-10-03 at 2.43.38 PM.png

ncfile.subtitle="My model data subtitle"
ncfile.anything="write anything"
print(ncfile.subtitle)
print(ncfile)
print(ncfile.anything)

Screen Shot 2017-10-03 at 2.45.55 PM.png

We can add as many attributes as we like.

Creating Variables

Now, let us add some variables to store some data in them. A variable has a name, a type, a shape and some data values. The shape of the variable can be stated using the tuple of the dimension names. The variable should also contain some attributes such as units to describe the data.

lat = ncfile.createVariable('lat', np.float32, ('lat',))
lat.units = 'degrees_north'
lat.long_name = 'latitude'
lon = ncfile.createVariable('lon', np.float32, ('lon',))
lon.units = 'degrees_east'
lon.long_name = 'longitude'
time = ncfile.createVariable('time', np.float64, ('time',))
time.units = 'hours since 1800-01-01'
time.long_name = 'time'
temp = ncfile.createVariable('temp',np.float64,('time','lat','lon')) # note: unlimited dimension is leftmost
temp.units = 'K' # degrees Kelvin
temp.standard_name = 'air_temperature' # this is a CF standard name
print(temp) 

Screen Shot 2017-10-03 at 2.51.29 PM.png

Here, we create the variable using the createVariable method. This method takes 3 arguments: a variable name (string type), data types, a tuple containing the dimension. We have also added some attributes such as for the variable lat, we added the attribute of units and long_name. Also, notice the units of the time variable.

We also have defined the 3-dimensional variable “temp” which is dependent on the other variables time, lat and lon.

In addition to the custom attributes, the netCDF provides some pre-defined attributes as well.

print("-- Some pre-defined attributes for variable temp:")
print("temp.dimensions:", temp.dimensions)
print("temp.shape:", temp.shape)
print("temp.dtype:", temp.dtype)
print("temp.ndim:", temp.ndim) 

Screen Shot 2017-10-03 at 2.57.36 PM

Since no data has been added, the length of the time dimension is 0.

Writing Data

nlats = len(lat_dim); nlons = len(lon_dim); ntimes = 3
lat[:] = -90. + (180./nlats)*np.arange(nlats) # south pole to north pole
lon[:] = (180./nlats)*np.arange(nlons) # Greenwich meridian eastward
data_arr = np.random.uniform(low=280,high=330,size=(ntimes,nlats,nlons))
temp[:,:,:] = data_arr # Appends data along unlimited dimension
print("-- Wrote data, temp.shape is now ", temp.shape)
print("-- Min/Max values:", temp[:,:,:].min(), temp[:,:,:].max())

Screen Shot 2017-10-03 at 3.02.52 PM.png

The length of the lat and lon variable will be equal to its dimension. Since the length of the time variable is unlimited and is subject to grow, we can give it any size. We can treat netCDF array as a numpy array and add data to it. The above statement writes all the data at once, but we can do it iteratively as well.

Now, let’s add another time slice.

data_slice = np.random.uniform(low=280,high=330,size=(nlats,nlons))
temp[3,:,:] = data_slice 
print("-- Wrote more data, temp.shape is now ", temp.shape) 

Screen Shot 2017-10-03 at 3.10.20 PM.png

Note, that we haven’t added any data to the time variable yet.

print(time)
times_arr = time[:]
print(type(times_arr),times_arr) 

Screen Shot 2017-10-03 at 3.12.50 PM.png

The dashes indicate that there is no data available. Also, notice the 4 dashes corresponding to the four levels in of the time stacks.

Now, let us write some data to the time variable using the datetime module of Python and the date2num function of netCDF4.

import datetime as dt
from netCDF4 import date2num,num2date
dates = [dt.datetime(2014,10,1,0),dt.datetime(2014,10,2,0),dt.datetime(2014,10,3,0),dt.datetime(2014,10,4,0)]
print(dates)

Screen Shot 2017-10-03 at 3.17.16 PM.png

times = date2num(dates, time.units)
print(times, time.units) # numeric values

Screen Shot 2017-10-03 at 3.18.53 PM.png

Now, it’s important to close the netCDF file which has been opened previously. This flushes buffers to make sure all the data gets written. It also releases the memory resources used by the netCDF file.

# first print the Dataset object to see what we've got
print(ncfile)
# close the Dataset.
ncfile.close(); print('Dataset is closed!')

Screen Shot 2017-10-03 at 3.23.38 PM.png


Reading NetCDF4 Data in Python

In Earth Sciences, we often deal with multidimensional data structures such as climate data, GPS data. It ‘s hard to save such data in text files as it would take a lot of memory as well as it is not fast to read, write and process it. One of the best tools to deal with such data is netCDF4. It stores the data in the HDF5 format (Hierarchical Data Format). The HDF5 is designed to store a large amount of data. NetCDF is the project hosted by Unidata Program at the University Corporation for Atmospheric Research (UCAR).

Here, we learn how to read and write netCDF4 data. We follow the workshop by Unidata. You can check out the website of Unidata.

Requirements:

Python3:

You can install Python3 via the Anaconda platform. I would recommend Miniconda over Anaconda because it is more light and installs only fundamental requirements for Python.

NetCDF4 Package:

conda install -c conda-forge netcdf4

Reading NetCDF data:

Now, we are good to go. Let’s see how we can read a netCDF data. The netCDF data has the extension of “.nc”


Importing NetCDF and Numpy ( a Python library that supports large multi-dimensional arrays or matrices):

import netCDF4
import numpy as np

Now, let us open a NetCDF Dataset object:

f = netCDF4.Dataset('../../data/rtofs_glo_3dz_f006_6hrly_reg3.nc')

Screen Shot 2017-10-03 at 12.21.35 PM.png

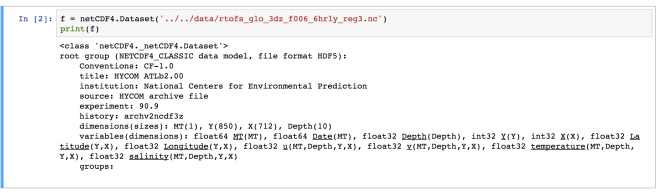
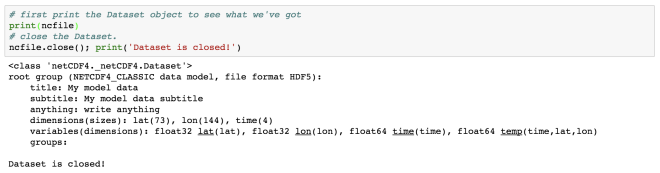
Here, we have read a NetCDF file “rtofs_glo_3dz_f006_6hrly_reg3.nc”. When we print the object “f”, then we can notice that it has a file format of HDF5. It also has other information regarding the title, institution, etc for the data. These are known as metadata.

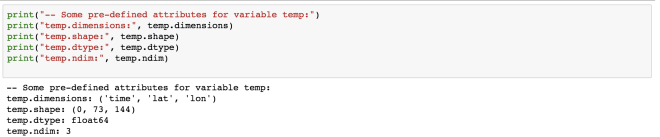
In the end of the object file print output, we see the dimensions and variable information of the data set. This dataset has 4 dimensions: MT (with size 1), Y (size: 850), X (size: 712), Depth (size: 10). Then we have the variables. The variables are based on the defined dimensions. The variables are outputted with their data type such as float64 MT (dimension: MT).

Some variables are based on only one dimension while others are based on more than one. For example, “temperature” variable relies on four dimensions – MT, Depth, Y, X in the same order.

We can access the information from this object, “f” just like we read a dictionary in Python.

print(f.variables.keys()) # get all variable names

Screen Shot 2017-10-03 at 12.35.04 PM.png

This outputs the names of all the variables in the read netCDF file referenced by “f” object.

We can also individually access each variable:

temp = f.variables['temperature'] # temperature variable
print(temp) 

Screen Shot 2017-10-03 at 12.35.47 PM.png

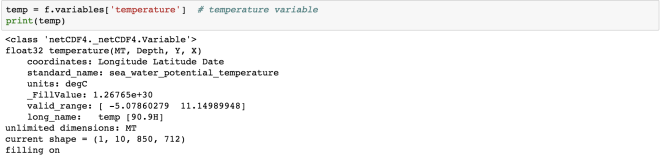
The “temperature” variable is of the type float32 and has 4 dimensions – MT, Depth, Y, X. We can also get the other information (meta-data) like the coordinates, standard name, units of the variable. Coordinate variables are the 1D variables that have the same name as dimensions. It is helpful in locating the values in time and space. The unit of temperature variable data is “degC”. The current shape gives the information about the shape of this variable. Here, it has the shape of (1, 10, 850, 712) for each dimension.

We can also check the dimension size of this variable individually:

for d in f.dimensions.items():
print(d)

Screen Shot 2017-10-03 at 12.44.11 PM.png

The first dimension “MT” has the size of 1, but it is of unlimited type. This means that the size of this dimension can be increased indefinitely. The size of the other dimensions is fixed.

For just finding the dimensions supporting the “temperature” variable:

temp.dimensions

Screen Shot 2017-10-03 at 12.51.38 PM.png

temp.shape

Screen Shot 2017-10-03 at 12.54.34 PM.png

Similarly, we can also inspect the variables associated with each dimension:

mt = f.variables['MT']
depth = f.variables['Depth']
x,y = f.variables['X'], f.variables['Y']
print(mt)
print(x)
print(y)

Screen Shot 2017-10-03 at 12.58.09 PM.png

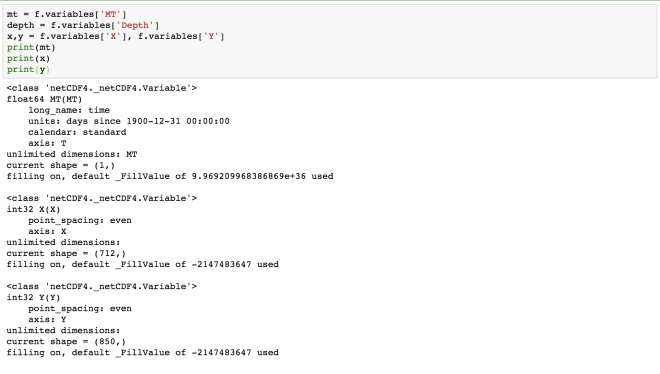
Here, we obtain the information about each of the four dimensions. The “MT” dimension, which is also a variable has a long name of “time” and units of “days since 1900-12-31 00:00:00”.  The four dimensions denote the four axes, namely- MT: T, Depth: Z, X:X, Y: Y.

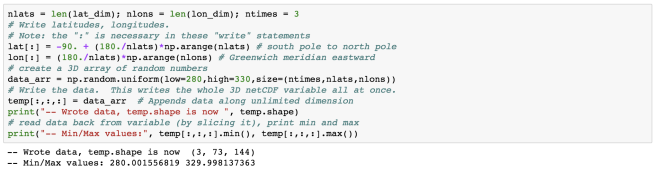
Now, how do we access the data from the NetCDF variable we have just read. The NetCDF variables behave similarly to NumPy arrays. NetCDF variables can also be sliced and masked.

Let us first read the data of the variable “MT”:
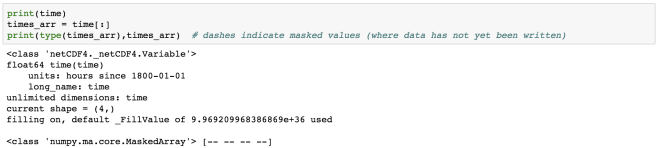
time = mt[:] 
print(time)

Screen Shot 2017-10-03 at 1.07.22 PM.png

Similarly, for the depth array:

dpth = depth[:]
print(depth.shape)
print(depth.dimensions)
print(dpth)

Screen Shot 2017-10-03 at 1.08.32 PM.png

We can also apply conditionals on the slicing of the netCDF variable:

xx,yy = x[:],y[:]
print('shape of temp variable: %s' % repr(temp.shape))
tempslice = temp[0, dpth > 400, yy > yy.max()/2, xx > xx.max()/2]
print('shape of temp slice: %s' % repr(tempslice.shape))

Screen Shot 2017-10-03 at 1.10.57 PM.png

Now, let us address one question based on the given dataset. “What is the sea surface temperature and salinity at 50N and 140W?

Our dataset has the variables temperature and salinity. The “temperature” variable represents the sea surface temperature (see the long name). Now, we have to access the sea-surface temperature and salinity at a given geographical coordinates. We have the variables latitude and longitude as well.

The X and Y variables do not give the geographical coordinates. But we have the variables latitude and longitude as well.

lat, lon = f.variables['Latitude'], f.variables['Longitude']
print(lat)
print(lon)
print(lat[:])

Screen Shot 2017-10-03 at 1.19.13 PM.png

Great! So we can access the latitude and longitude data. Now, we need to find the array index, say iy and ix such that Latitude[iy, ix] is close to 50 and Longitude[iy, ix] is close to -140. We can find out the index by defining a function:

# extract lat/lon values (in degrees) to numpy arrays
latvals = lat[:]; lonvals = lon[:] 

# a function to find the index of the point closest pt
# (in squared distance) to give lat/lon value.
def getclosest_ij(lats,lons,latpt,lonpt):
 # find squared distance of every point on grid
 dist_sq = (lats-latpt)**2 + (lons-lonpt)**2 
 # 1D index of minimum dist_sq element
 minindex_flattened = dist_sq.argmin()
 # Get 2D index for latvals and lonvals arrays from 1D index
 return np.unravel_index(minindex_flattened, lats.shape)

iy_min, ix_min = getclosest_ij(latvals, lonvals, 50., -140)
print(iy_min)
print(ix_min)

Screen Shot 2017-10-03 at 1.24.01 PM.png

So, now we have all the information required to answer the question.

sal = f.variables['salinity']
# Read values out of the netCDF file for temperature and salinity
print('%7.4f %s' % (temp[0,0,iy_min,ix_min], temp.units))
print('%7.4f %s' % (sal[0,0,iy_min,ix_min], sal.units))

Screen Shot 2017-10-03 at 1.27.04 PM.png

Accessing the Remote Data via openDAP:

We can access the remote data seamlessly using the netcdf4-python API. We can access via the DAP protocol and DAP servers, such as TDS.

For using this functionality, we require the additional package “siphon”:

conda install -c unidata siphon 

Now, let us access one catalog data:

from siphon.catalog import get_latest_access_url
URL = get_latest_access_url('http://thredds.ucar.edu/thredds/catalog/grib/NCEP/GFS/Global_0p5deg/catalog.xml',
 'OPENDAP')
gfs = netCDF4.Dataset(URL)

Screen Shot 2017-10-03 at 1.36.59 PM.png

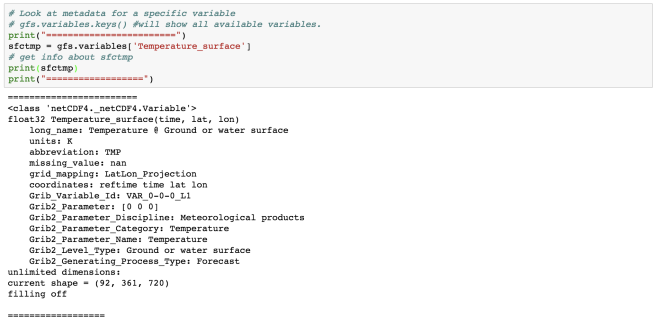
# Look at metadata for a specific variable
# gfs.variables.keys() #will show all available variables.
print("========================")
sfctmp = gfs.variables['Temperature_surface']
# get info about sfctmp
print(sfctmp)
print("==================")

Screen Shot 2017-10-03 at 1.38.19 PM.png

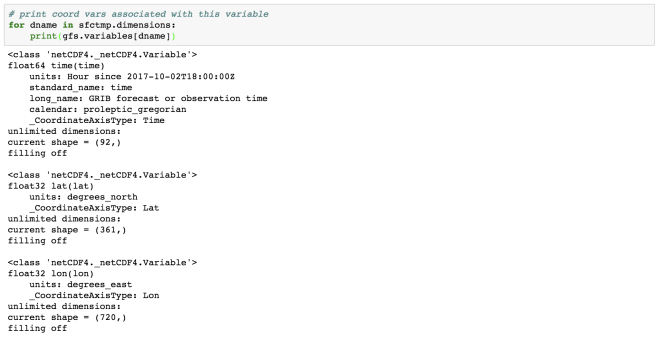
# print coord vars associated with this variable
for dname in sfctmp.dimensions: 
 print(gfs.variables[dname])

Screen Shot 2017-10-03 at 1.39.42 PM.png

Dealing with the Missing Data

soilmvar = gfs.variables['Volumetric_Soil_Moisture_Content_depth_below_surface_layer']
print(soilmvar)
print("================")
print(soilmvar.missing_value)

Screen Shot 2017-10-03 at 1.42.51 PM.png

# flip the data in latitude so North Hemisphere is up on the plot
soilm = soilmvar[0,0,::-1,:] 
print('shape=%s, type=%s, missing_value=%s' % \
 (soilm.shape, type(soilm), soilmvar.missing_value))

Screen Shot 2017-10-03 at 1.44.02 PM.png

import matplotlib.pyplot as plt
%matplotlib inline
cs = plt.contourf(soilm)

Screen Shot 2017-10-03 at 1.45.33 PM.png

Here, the soil moisture has been illustrated on the land only. The white areas on the plot are the masked values.

Dealing with Dates and Times

The time variables are usually measured relative to a fixed date using a certain calendar. The specified units are like “hours since YY:MM:DD hh:mm:ss”.

from netCDF4 import num2date, date2num, date2index
timedim = sfctmp.dimensions[0] # time dim name
print('name of time dimension = %s' % timedim)

Screen Shot 2017-10-03 at 1.51.34 PM.png

Time is usually the first dimension.

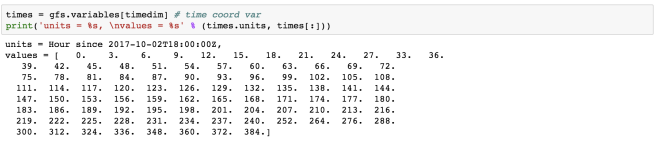
times = gfs.variables[timedim] # time coord var
print('units = %s, values = %s' % (times.units, times[:]))

Screen Shot 2017-10-03 at 1.54.25 PM.png

dates = num2date(times[:], times.units)
print([date.strftime('%Y-%m-%d %H:%M:%S') for date in dates[:10]]) # print only first ten...

Screen Shot 2017-10-03 at 1.55.46 PM.png

We can also get the index associated with the specified date and forecast the data for that date.

import datetime as dt
date = dt.datetime.now() + dt.timedelta(days=3)
print(date)
ntime = date2index(date,times,select='nearest')
print('index = %s, date = %s' % (ntime, dates[ntime]))

Screen Shot 2017-10-03 at 1.57.50 PM.png

This gives the time index for a time nearest to 3 days from today, current time.

Now, we can again make use of the previously defined “getcloset_ij” function to find the index of the latitude and longitude.

lats, lons = gfs.variables['lat'][:], gfs.variables['lon'][:]
# lats, lons are 1-d. Make them 2-d using numpy.meshgrid.
lons, lats = np.meshgrid(lons,lats)
j, i = getclosest_ij(lats,lons,40,-105)
fcst_temp = sfctmp[ntime,j,i]
print('Boulder forecast valid at %s UTC = %5.1f %s' % \
 (dates[ntime],fcst_temp,sfctmp.units))

Screen Shot 2017-10-03 at 2.01.18 PM.png

So, we have the forecast for 2017-10-06 15 hrs. The surface temperature at boulder is 304.2 K.

Simple Multi-file Aggregation

If we have many similar data, then we can aggregate them as one. For example, if we have the many netCDF files representing data for different years, then we can aggregate them as one.

Screen Shot 2017-10-03 at 2.08.20 PM.png

Multi-File Dataset (MFDataset) uses file globbing to patch together all the files into one big Dataset.
Limitations:- It can only aggregate the data along the leftmost dimension of each variable.

  • It can only aggregate the data along the leftmost dimension of each variable.
  • only works with NETCDF3, or NETCDF4_CLASSIC formatted files.
  • kind of slow.
mf = netCDF4.MFDataset('../../data/prmsl*nc')
times = mf.variables['time']
dates = num2date(times[:],times.units)
print('starting date = %s' % dates[0])
print('ending date = %s'% dates[-1])
prmsl = mf.variables['prmsl']
print('times shape = %s' % times.shape)
print('prmsl dimensions = %s, prmsl shape = %s' %\
 (prmsl.dimensions, prmsl.shape))

Screen Shot 2017-10-03 at 2.10.53 PM.png

Finally, we need to close the opened netCDF dataset.

f.close()
gfs.close()

Screen Shot 2017-10-03 at 2.12.18 PM.png

To download the data, click here. Next, we will see how to write a netCDF data.
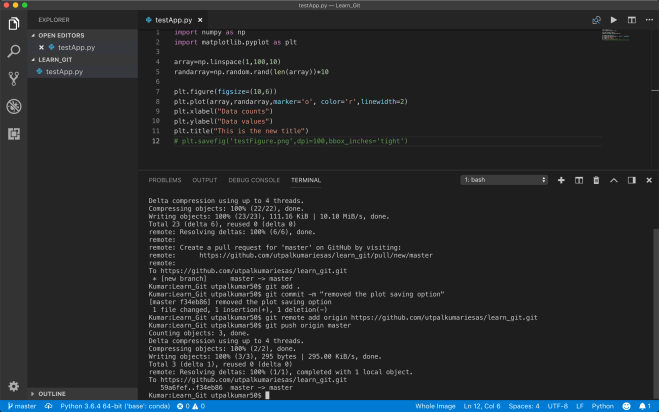
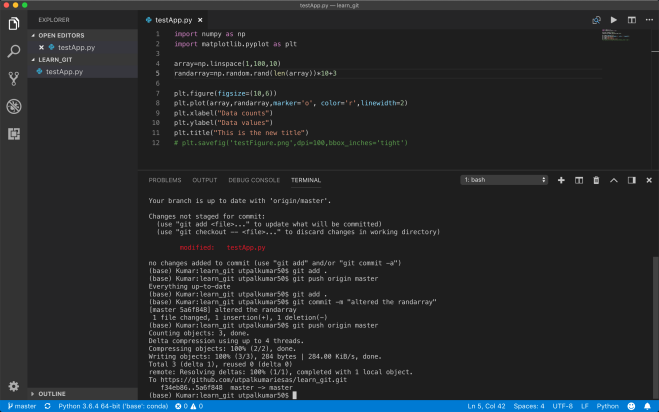
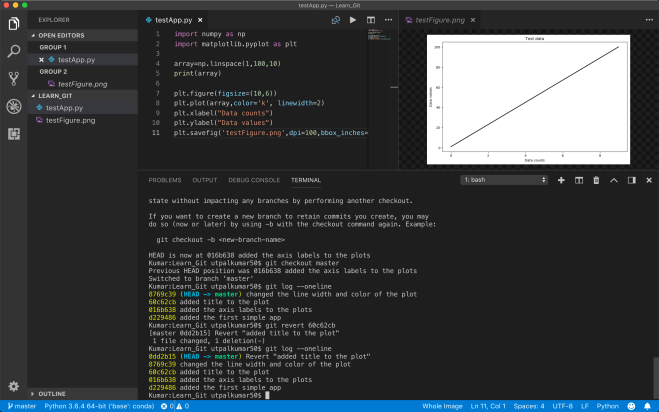
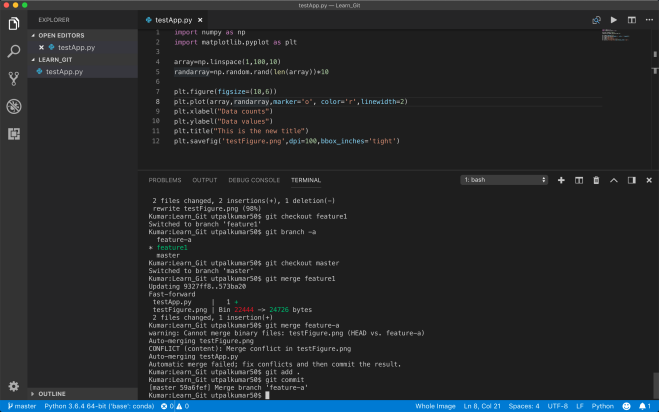